Monday, December 21, 2009

Flower Frog Fun

Over this past summer I purchased a milk glass flower frog at a yard sale. Flower frogs seem to be plentiful at yard sales, antique stores and flea markets and as a bonus, are very inexpensive. I didn't really have a plan for how I was going to use it, so it has been sitting in my closet ever since. The other day I decided to pull it out and came up with these fun ideas. A colored pencil holder for my desk.

A birthday candle holder. I like the idea of placing the flower frog with the candles on top of a cake stand on which you could put cupcakes, cookies or other treats.
A card display. Here are a few of my vintage Valentines Day cards. I used paper wrapped floral wire and bent the end into a circle to form the end to hold the card. This would also work for photos, small art work, etc.
Of course, a flower holder, the original purpose of the flower frog.
A Christmas decoration of simple greens. (Sorry these are looking a bit dry.)Finally, a lollipop holder. How fun would this be for a child's birthday party!

I had some other ideas as well including candy canes, small flags, knitting needles and even a fruit kabob holder. If you have other ideas for using a flower frog I would love to hear them!

Thursday, December 17, 2009

A Wish Granted

One of the observances I have made over the years with my children is how important the little things in life are to them. A phone call on their birthday, a letter in the mail, or a surprise package all make them feel so special. It isn't the monetary value of the item, it is the fact that someone remembered them. So a goal of mine this year is to do more "surprises" not only for my own kids but for all the special people in my life.

When my sister and I were talking about Christmas, she told me she was having an impossible time fulfilling her oldest son's only wish. I came up with an idea to help and made him this pillow.
You see, her six year old son is obsessed with stop lights. He dressed up as a stop light for Halloween (complete with working lights) and wants nothing more than a stop light for Christmas. As my sister can attest to, not the easiest thing for a parent to find.

It makes me so happy that I was able to grant him his Christmas wish. We will be seeing him over the Christmas holiday and I can't wait to see the look on his face when he gets his pillow.
To make a pillow like this for the "stop light lover" in your family you will need a pillow form, duck cloth, felt, scissors, needle and thread. Cut two pieces of duck cloth the same size as your pillow form. Using black felt, cut out a rectangle for the back of the stop light. Cut one circle (all the same size) from red, yellow and green felt. (A cup or small plate works great for a circle template.) Sew the three circles by hand to the black felt. Pin and sew stop light on to duck cloth.Using a program like Word, print off the words "stop", "slow", and "go" onto a piece of paper. (I used Gil San Ultra bold in size 110). Cut out each letter from the paper to form a letter pattern. Pin paper letters to black felt and cut around. Pin and sew letters to pillow front.
Pin right sides of pillow front and pillow back together, matching up corners. Sew around edge using a 1/2" seam allowance and leaving an opening several inches long along one side. Turn pillow right side out through opening. Insert pillow form. Pin opening closed and sew.

Monday, December 14, 2009

A Charlie Brown Christmas Tree

I have long admired pictures of houses decorated with more than one Christmas tree. They always look so festive. So this year I decided to add a second tree to my house. I went out to the small patch of woods behind our house and returned with ....
... my own "Charlie Brown" Christmas tree. I placed it in a vintage white McCoy pot and anchored the tree with small gravel from our garden. The pot was then placed in a vintage wagon which usually holds either a large plant or a variety of blankets and books during the rest of the year.
The branches are few and far between so I kept the decorations simple and to a minimum - glass balls from Target and stars I made from left over feed sacks fabric pieces.

To make the star ornaments print a picture of a star off your computer. (I made two different sizes.) Pin the wrong sides together, inserting a raffia loop on the top. Sew around the edges by hand or with a sewing machine, leaving a small opening for stuffing. (I used a sewing machine and sewed around the outside twice to prevent fraying.) Stuff the star lightly and sew closed. Embellish as you wish or leave plain.
This will be my final holiday decorating post for this Christmas season. Thank you for allowing me to share my home and traditions with you. I have so enjoyed all your wonderful comments and blogs. Best wishes for a blessed holiday from me to you.

Thursday, December 10, 2009

Gingerbread House Decorating Party

One of my favorite holiday traditions is my annual gingerbread house decorating party. I make the houses and my friends bring the candy and icing for the decorating. We spend the afternoon talking, eating too much candy and decorating houses - peeking at each other's ideas along the way.

About two weeks before the party I bake the gingerbread house pieces. The weekend prior to the party I assemble the houses. The houses are made from a cookie cutter kit available at MagicCabin.com. The kit includes cookie cutters, directions, and recipes for the gingerbread and icing used to glue all the pieces together. I find making the houses in an assembly line fashion much quicker than making each house individually. For the base, I head to the dollar store and purchase small pizza pans which can be reused each year.

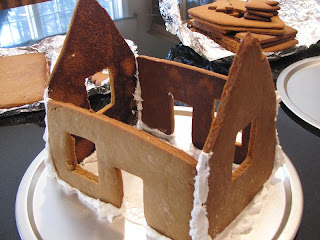
Below is a picture of the houses all assembled and waiting to be decorated. A little gingerbread house village. They are not perfect but once the houses are covered in candy, no one will notice!As everyone arrives, they put the candy they have purchased in the middle of the kitchen island. As you can see there was no shortage of candy here. To attach the candy, we use store bought icing.
Almost done.
And here are the finished houses. Even though we all started out with the same basic house each one turned out a little different. Each one as pretty as the next.

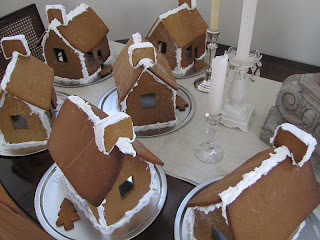
When it is time to go, all the houses are wrapped with cellophane and tied with a white ribbon. The big question at the end of the day is always "when are you going to eat it?" Most of my friends leave their houses wrapped until Christmas day. A fun family tradition my friends have started as a result of this party. Since I don't end up wrapping mine, it usually only lasts a few days before pieces of candy begin to go missing from my house. I will give you one guess as to who is the first to take a piece!

Sunday, December 6, 2009

My Home for the Holidays - Part II

In the second part of My Home for the Holidays series, I wanted to highlight some simple table top decorations as well as show how I use continuity - inside and out - to bring my entire house's decorating scheme together.

Although I am quite sure this is not a new idea, I use white ribbons to hang the wreaths on the outside of my house instead of the traditional red. I love the way they look against the gray siding and the red door. They also give everyone who drives by a hint of what lies inside . . .


. . . more white. I use a simple garland with pine cones, white ribbons and hand blown glass ornaments on my banister to continue my simple color palette.
I also hang a wreath on an inside door leading into my "red" room. The stand in the left hand corner is really a tall candle holder that I have filled with pine cones, greenery and a twig wreath. The oak door with glass insert and copper handle is part of a pair that my husband found while we were building our house. We were so pleased that our builder was able to install these instead of the new paned glass doors we had originally planned.
The simple theme continues with table top displays including this white compote filled with pine cones, greenery and a bird's nest. I covered the books underneath the compote with simple brown wrapping paper.
Here I filled an a white ironstone sugar bowl with greenery and a snowman ornament.
Finally, a domed cake stand complete with "snow," snowman ornament, vintage looking glass balls, and flocked miniature Christmas tree. If you look in the background of this picture you will notice several undecorated gingerbread houses - a hint for what is coming up in my next post!
Blog Widget by LinkWithin