Saturday, May 29, 2010

Basement Bathroom

I received a nice surprise yesterday. A friend called to tell me she had seen my basement bathroom in Real-Life Kitchen and Baths – a special interest magazine by Meredith publications.

Real-Life Kitchen and Baths / Photographer - Bryan McCay
Stylist - Donna Talley, Regional Editor and Producer for Meredith Publications

For those of you who have been followers for a while, you might recognize this story as a rerun of an article which appeared in the winter 2009 edition of Better Homes and Gardens’ Kitchen and Bath Makeovers.

Real-Life Kitchen and Baths

Real-Life Kitchen and Baths / Photographer - Bryan McCay
Stylist - Donna Talley, Regional Editor and Producer for Meredith Publications

This bathroom was part of an overall basement remodel which also included a sitting area, bedroom and storage.

Better Homes and Gardens / Photographer - John Bessler
Stylist - Donna Talley, Regional Editor and Producer for Meredith Publications


Better Homes and Gardens /  Photographer - John Bessler
Stylist - Donna Talley, Regional Editor and Producer for Meredith Publications

We wanted a space which would be suitable for guests as well as serve the needs of our family. Although this bathroom is a fairly small space, we took our time planning out every detail. We began by listing everything we wanted, regardless of cost.

Real-Life Kitchen and Baths

Real-Life Kitchen and Baths / Photographer - Bryan McCay
Stylist - Donna Talley, Regional Editor and Producer for Meredith Publications

This helped us decide what was most important and where we could save money. One of the compromises we made was the shower. Our first choice was a tiled shower, complete with glass doors. Because this is a guest bathroom, we opted instead for a shower insert surrounded by tile and a shower curtain I made from Amy Butler fabric and quilting fabric.

Real-Life Kitchen and Baths

Real-Life Kitchen and Baths

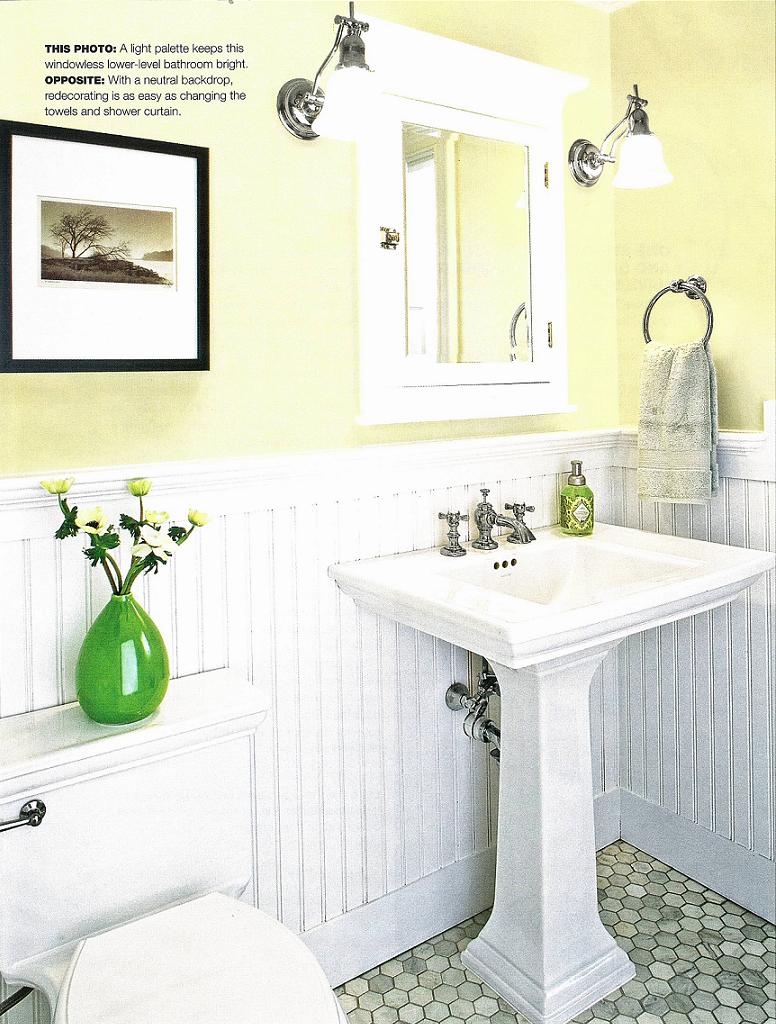
We also stayed on budget by purchasing the hexagon marble floor tiles from Ebay and the towel bar, faucet, and medicine cabinet on sale from Restoration Hardware.

Real-Life Kitchen and Baths / Photographer - Bryan McCay
Stylist - Donna Talley - Regional Editor and Producer for Meredith Publications

Real-Life Kitchen and Baths / Photographer - Bryan McCay
Stylist - Donna Talley, Regional Editor and Producer for Meredith Publications

Overall, we have remained very pleased with our choices. Our family and friends seem to always ask if they can stay longer the next time they come. I guess this means all our patience and planning were well worth the effort!

Monday, May 24, 2010

How to Whiten Ironstone

On a recent trip to the Salvation Army I purchased a white ironstone platter for 49 cents.
Although it was somewhat discolored (not the worst I have seen), I thought it was a great bargain. It was also the perfect price for attempting Pam Stamey’s simple three step process for whitening ironstone. (July/August 2001 edition Country Home magazine)
Country Home magazine

What I Did:
#1 - Soak ironstone in clear water for 24 hours.
#2 – While wearing heavy-duty rubber gloves, fill a tub with 40-percent clear peroxide. (I purchased mine at Sally Beauty Supply for $5 a bottle.) Place ironstone in the peroxide, making sure the entire piece is submerged. Pam recommends letting the ironstone soak for 5 to 7 days.
I let my platter soak for 6 days. After removing it from the peroxide it was already much whiter.

#3 – Preheat an electric oven to 250 degrees. (Do not use a gas oven.) Put ironstone in the oven for about 20 minutes.  Pam bakes her pieces on glass plates. I used a cookie tray lined with parchment paper.
The brown color should rise to the surface (which it did on my platter). Remove from oven. Let cool. Wash in hot soapy water.

Final Results:
You can see from the pictures below this process really works. Most of the large brown spots have disappeared and the platter is much whiter.


What I learned:
Since this is such an easy process, I won’t be passing up ironstone that is significantly discolored any more.

Although my results were not as dramatic as the Country Home picture shown above - my platter still had a few brown marks - it was definitely a lot whiter and brighter.

I am looking forward to trying Pam’s method for repairing chipped and cracked ironstone - as soon as I find an appropriate piece of china.

The saleswoman at the beauty supply store told me the peroxide would remain good for a year after it was opened. She also told me it could be saved and reused. Does anyone know if this is true? I saved the peroxide I bought but want to make sure it is safe to use again.

Linking up to some of my favorite parties

Saturday, May 15, 2010

Final Bedroom Reveal

For the past few weeks I have been showing various parts of my daughter’s bedroom makeover. I so appreciate everyone who has followed along and shared such encouraging comments. Thank you! So, without further delay, here is the room in its entirety.
Where we began
As I have mentioned before, my daughter’s room was decorated around a blue and green Laura Ashley bedding set I used when I was in college.
I made the curtains from an extra set of sheets. The dressing table was a roadside find which I panted and stenciled. You can tell from the before photos, I was very much into everything matching perfectly. I have since come to realize by mixing things up a bit, a room becomes more interesting.
Putting it all together
Although my daughter has not reached double digits, she wanted a room where she could make some of the decorating choices. We were not initially on the same page, but through compromise – she wanted pink and dogs and I wanted a space that would fit in with the rest of the house and one she would not out grow in a few years - we were able to create a room we both love. The starting point for the entire project was the curtain fabric.
I have to admit it was a real struggle to find coordinating fabric to use for the Euro shams. After many hours online, I finally found the pink zebra fabric. (I apologize for not remembering the source.) The regular shams are made from left over fabric from another project and the long pillow with the flowers I made from inexpensive suiting material.
The bedside table is topped with a piece of marble I purchased at an antiques store. I love how the gray veining picks up the other gray features in the room and adds another layer of texture to the space. (To see the story behind the marble click here.) The lamp is one of a pair which I painted and glazed.
For artwork, I created inexpensive dog silhouettes, . . .
. . . updated a bulletin board with ribbon . . .
. . . and added a simple frame around the chandelier.
The dressing table was updated with a fresh coat of paint . . .
. . . and accessorized with vintage and yard sale finds.

Unplanned Changes
One of the biggest changes in this room was the flooring. You may have noticed from the before picture, the bedroom was carpeted. Installing hardwood floors was not in the original redo plan. In fact, the room was basically finished when we decided to replace the carpeting. We were at the point where something had to be done - markers, nail polish and lotion just do not work well with white carpet.
Replacing the carpeting with wood floors meant purchasing a rug. After what seemed like endless searching for the right color and size, I finally splurged on the pink and white rug you see above – the finishing touch to the room.

So there you have it – my daughter’s room redo! It is hard to believe the entire process started over 8 months ago. Overall, I think we achieved the goals of this project. I am very pleased with the results and most importantly, so is my daughter.

Sources:Bed – Ethan Allen
Dresser – Ethan Allen
Rug – Madeline Weinrib
Dresser lamp – vintage yard sale find
Bedside lamp – repainted brass lamp
Curtain fabric – Calico Corners
Pillow fabric (gray and pink) – JoAnn Fabrics
Pillow fabric (tan velvet) – Calico Corners
White faux fur throw – Home Goods
Sunburst mirror – Wisteria
Upholstered cubes – Target
Upholstered cube slipcover fabric – fabric JoAnn Fabrics
Bulletin Board – Ballard Design
Small Shelf below bulletin board - Target

Linking up to some of my favorite parties.

Sunday, May 9, 2010

Bedroom Makeover Part 3 – Dog Silhouettes

The third part of my daughter’s bedroom makeover features a simple DIY project – dog silhouettes. Silhouettes in various forms have been shown numerous times all across the blogging world for three simple reasons – they are inexpensive, easy to make, and look great with almost any decor.
Besides keeping costs down, another goal of this project was to include my daughter’s ideas in the design of the space. She was the client and my job was to make a room she liked. She had two specifications - pink and dogs. Knowing a themed space would grow tiresome quickly and not wanting to venture into the “pink puppy” world, the silhouettes were a great compromise.

What I did:
The first step in this project was painting the picture frames pink. My initial attempt didn’t work out quite right – the paint looked too neon. I adjusted to color by adding some brown to tone the pink down to the right color.
After painting and sealing the frames, the next step was creating the silhouettes. I searched the internet for pictures of dogs which would have recognizable outlines. This process was a great way to involve my daughter as she told me what types of dogs she liked. We selected and printed out four pictures.
After cutting out the images, we used a white crayon to trace the outlines of the dogs onto black cardstock.
The images were cut and glued onto white paper. (It is hard to tell from the pictures but the white paper has tiny ridges for added texture.)
We assembled the frames and hung the pictures. Simple, quick and easy!
Supplies:
The four frames and supplies were purchased at AC Moore for less than $60.
Picture frames
Paint
Black paper
Scissors
Glue
White paper
White crayon

In case you missed it, here are some previous posts highlighting other projects in my daughter’s bedroom redo:
Dressing table redo
Bulletin board project
Marble top night stand
Ceiling embellishment

Linking up to some of these parties

Monday, May 3, 2010

Bedroom Makeover Part 2 – Dressing Table

The second part of my daughter’s bedroom makeover features her dressing table.
A roadside find from many years ago, this piece of furniture has seen many coats of paint. It is one of those makeover stories, that taken out of context, will probably have many people liking the before better than the after.

In part one of this bedroom redo, I mentioned her previous room had been designed around a 20 year old blue and green Laura Ashley bedding ensemble from my college days. The dressing table was painted and stenciled (my one and only attempt at this technique) to match.
Since there was so much pattern and color in the rest of her room, I opted to paint and glaze the dressing table the same color as the curtain fabric - not very exciting when seen by itself but very fitting when seen with the rest of the room.
The dressing table includes the original hardware and a glass top which was custom cut to fit. It is paired with a metal chair I inherited from my Grandmother. The seat cover is pieced together from left over fabric from the bedding pillows.
Simple accessories including a bright pink jewelry box, a two tier silver tray purchased at a yard sale for $3, a vintage glove form from Ebay, and a display shelf above the mirror are all meant to keep my daughter’s things organized.
As you can see, one of the main goals of this project was to use things that were already in the room and fill in with inexpensive accessories. Next up is a DIY project for making inexpensive artwork. Hope you will come back to see it!

Sources:
Dressing table – roadside find
Pink jewelry box – TJ Maxx
Vintage silver stand – yard sale find
Vintage glove form – Ebay
Metal chair – family hand-me-down
Mirror – family hand-me-down
Shelf above mirror – Pottery Barn
Framed ceiling tins – vintage finds

In case you missed it, here are some previous posts highlighting other projects in my daughter’s bedroom redo:
Bulletin Board Project
Marble top night stand
Ceiling embellishment


Linking up to some of these parties
Blog Widget by LinkWithin